
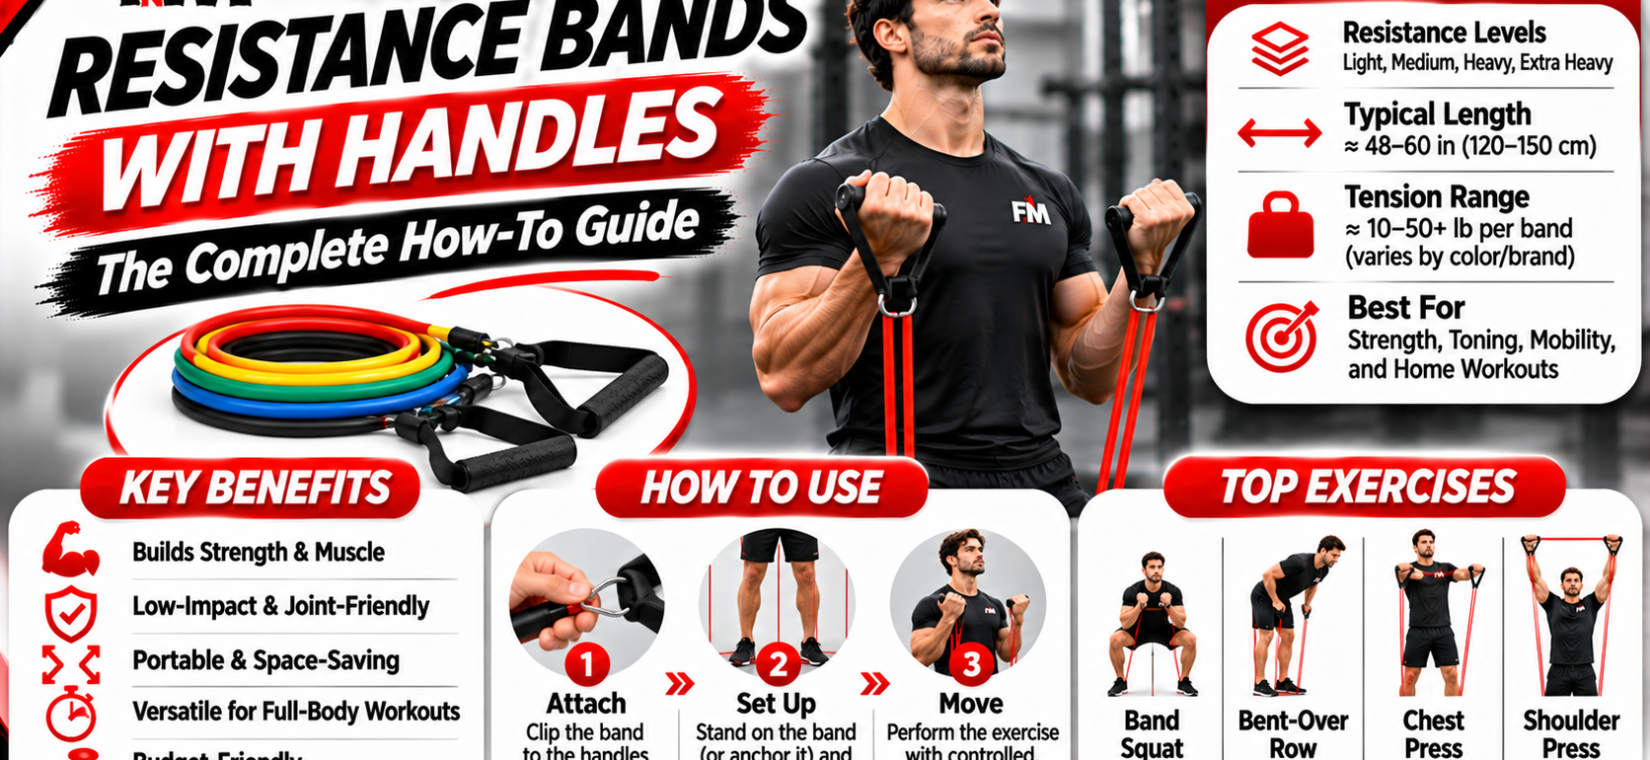
Resistance bands with handles are elastic bands fitted with padded grips, a door anchor, and stackable tubes rated 10 to 50 pounds each. They build full-body strength through variable resistance that increases as the band stretches. A 20 to 30 minute routine with resistance bands with handles, three times weekly, delivers strength gains comparable to dumbbell training for most beginners.
Resistance bands with handles are the most versatile piece of portable gym equipment you can own. A set costs a fraction of a dumbbell rack, weighs under a kilogram, and still delivers enough tension — up to 50 lbs (23 kg) per tube, stackable to 150+ lbs — to build real muscle. Studies show elastic resistance activates muscles comparably to free weights when effort is matched: a 2019 meta-analysis in SAGE Open Medicine found similar strength gains between elastic bands and conventional resistance training across 12 trials.
This guide walks you through everything: what resistance bands with handles are, why they work, a detailed step-by-step full-body workout, how to choose resistance levels, the mistakes that stall progress, how they compare to dumbbells and loop bands, and safety essentials.
Quick Answer
Resistance bands with handles are elastic exercise tubes with padded grips that provide adjustable resistance for strength training. They work because elastic tension increases as the band stretches, keeping muscles under load through the full range of motion. A 20–30 minute routine with resistance bands with handles, performed 3 times per week, can build strength and muscle comparable to a dumbbell program for beginners and intermediates. Start with a light band, master form, and add tubes as you get stronger.
What Are Resistance Bands with Handles?
Resistance bands with handles consist of hollow-core latex (or latex-free TPE) tubes, each capped with a padded foam or plastic grip. Most sets include 4–6 color-coded tubes ranging from about 10 lbs (4.5 kg) to 50 lbs (23 kg) of peak tension, plus accessories: a door anchor, two ankle straps, and sometimes a small poster of exercises. The tubes clip to the handles with carabiner-style connectors, so you can stack multiple bands on one handle to combine resistance — two 30-lb tubes give roughly 60 lbs of peak tension.
Unlike flat loop bands (the mini-bands used for glute activation), resistance bands with handles are long — typically 120–150 cm — which allows pressing, rowing, and curling movements that mimic cable-machine paths. The handles matter: they let you grip naturally, rotate wrists freely, and perform pulling movements without the band digging into your palms.
Build quality varies. Look for resistance bands with handles that use layered latex tubes (3+ layers resist snapping far better than single-layer), stitched nylon webbing where tube meets handle, and handles with contoured foam that doesn’t compress flat after a month. Cheap sets with thin plastic handles and unlayered tubes are the ones that snap — and they’re the reason “resistance band snapped” stories exist.
Why Resistance Bands with Handles Work
The physics is called variable linear resistance: the further you stretch resistance bands with handles, the harder they pull back. A band rated 20 lbs delivers close to that 20 lbs only near full stretch; at half stretch it might deliver 8–10 lbs. This curve has two practical effects. First, the “sticking point” of a lift — the hardest 20% of the range, where free weights often stall you — gets proportionally more load, which research links to greater motor-unit recruitment. Second, the negative (lowering) phase stays loaded, because the band keeps pulling as it shortens, unlike a dumbbell whose effective load drops near lockout in some movements.
A 2022 review in the International Journal of Environmental Research and Public Health concluded that elastic-resistance training produced strength and hypertrophy outcomes statistically similar to free-weight training in untrained and moderately trained adults, provided sets were taken near muscular fatigue. Translation: resistance bands with handles build muscle when you push them hard — the tool doesn’t matter as much as the effort.
Resistance bands with handles also shine for joint-friendly training. There’s no impact, no dropped weight, and the resistance curve is gentlest at the joint angles where you’re weakest — exactly where injuries happen. Physical therapists have used elastic resistance for decades for this reason; Wikipedia’s overview of resistance bands notes their long history in rehabilitation settings.
Step-by-Step Full-Body Workout
Perform this routine 3 days per week (e.g., Monday, Wednesday, Friday). Rest 45–60 seconds between sets. Each exercise uses your resistance bands with handles — anchor points noted per move.
- Chest press (door anchor, chest height) — 3 × 10–12
- Loop the door anchor at chest height, thread one tube through, and hold a handle in each hand.
- Face away from the door, stagger your stance, elbows at 75° to your torso.
- Press forward until arms are nearly straight; squeeze the chest for 1 second, then lower over 3 seconds.
- Standing row (door anchor, chest height) — 3 × 10–12
- Turn to face the door. Step back until the tubes are taut with arms extended.
- Pull handles to your lower ribs, driving elbows behind you and pinching shoulder blades.
- Keep your torso rigid — no leaning back to cheat.
- Overhead shoulder press (stand on tube) — 3 × 8–10
- Stand on the middle of a tube, handles at shoulder height, palms forward.
- Press straight up until arms are extended; don’t shrug the shoulders to your ears.
- Lower slowly to the start position.
- Biceps curl (stand on tube) — 3 × 10–15
- Stand on the tube, arms at your sides, palms up.
- Curl to shoulder height, keeping elbows pinned at your ribs.
- Full range matters more than heavy bands here.
- Triceps pushdown (door anchor, top) — 3 × 10–12
- Set the anchor above the door, face the door, elbows tucked at your sides.
- Push handles down until arms are straight; only the forearms move.
- Squat (stand on tube, handles at shoulders) — 3 × 12–15
- Stand on the tube with feet shoulder-width, handles resting at shoulder height.
- Sit back and down until thighs are parallel; drive up through the heels.
- The bands add serious load at the top — stand tall and squeeze the glutes.
- Romanian deadlift (stand on tube) — 3 × 10–12
- Stand on the tube holding both handles, feet hip-width.
- Hinge at the hips, pushing them back, lowering handles to mid-shin with a flat back.
- Drive hips forward to stand. This is a hinge, not a squat.
- Lateral raise (stand on tube) — 2 × 12–15
- Lightest band. Stand on the tube, arms at sides, slight elbow bend.
- Raise arms to shoulder height, leading with the elbows; lower slowly.
- Woodchopper (door anchor, top) — 2 × 12 per side
- Stand sideways to the door, anchor high. Pull the handle diagonally down across your body.
- Rotate through the torso; keep arms relatively straight.
- Glute kickback (ankle strap, anchor low) — 2 × 15 per leg
- Attach the ankle strap, anchor at the door’s base. Face the door.
- Kick the strapped leg straight back, squeezing the glute at the top.
- Standing calf raise (stand on tube, handles at shoulders) — 2 × 15–20
- Rise onto the balls of your feet; pause 1 second at the top.
- Pallof press (anchor at chest height) — 2 × 10 per side
- Stand sideways to the door, hold both handles at your chest.
- Press straight out and resist the band’s pull to rotate you — pure anti-rotation core work.
Total time: about 30 minutes. When you can complete all sets at the top of the rep range with 1–2 reps left in the tank, add the next tube. For programming beyond this starter plan, see FitnMeet’s strength training guides.
Choosing Your Resistance Level
Pick your starting tube by exercise, not ego:
- Upper-body small muscles (raises, curls): 10–20 lb tube. Form first.
- Pressing and rowing: 20–30 lb tube to start; stack two for 40–60 lbs as you progress.
- Legs (squats, deadlifts): stack 2–3 tubes immediately — legs are strong, and a single tube won’t challenge them.
- Rule of thumb: choose a band that lets you hit the bottom of the rep range with good form and reach near-failure at the top of the range. If you can do 20+ easy reps, add a tube.
Resistance bands with handles lose tension over time — latex fatigues. If a band that used to challenge you feels easy after 6–12 months of regular use (and you haven’t gotten dramatically stronger), the tube is likely worn. Replace tubes, not the whole set; quality brands sell tube-only replacements. Store resistance bands with handles out of sunlight and away from heat, which accelerates latex breakdown.
- Stackable clip system (not fixed single tubes)
- Layered latex or latex-free TPE tubes
- Padded, contoured handles (not hard plastic)
- Door anchor + ankle straps included
- At least 4 tubes (10–50 lb range)
Shop training gear at FitnMeet to complete your home setup.
Benefits of Resistance Bands with Handles
- Full gym in a bag: resistance bands with handles plus a door anchor replicate most cable-machine movements — chest press, rows, curls, extensions, squats — in about 1 kg of gear.
- Joint-friendly loading: resistance is lightest where joints are most vulnerable (the stretched position), reducing shear stress compared to free weights.
- Constant tension: unlike dumbbells, resistance bands with handles keep pulling through the entire rep, including the lowering phase — more time under tension per set.
- Beginner-safe: no dropped weights, no spotter needed, and you can bail out of any movement simply by releasing tension.
- Travel-proof: a full set of resistance bands with handles fits in a carry-on. Hotel-room workouts stop being an excuse.
- Budget-friendly: a quality set costs 5–10% of a comparable dumbbell set and never needs a rack.
- Rehab and prehab: light tubes are the standard tool for rotator-cuff, knee, and ankle rehab progressions — the same bands scale from physical therapy to heavy pressing.
Mistakes to Avoid
1. Using too much band, too soon. Ego-loading with resistance bands with handles looks like half-range reps and shrugged shoulders. Drop a tube and own the full range — the stretch at the bottom is where the growth stimulus lives. Support your training with picks from our workout recovery category.
2. Ignoring the anchor. A door anchor must sit on the hinge side of a closed, locked door, with the strap fully through. Anchoring to a door that opens toward you is how bands become projectiles. Check the anchor before every set.
3. Letting bands snap back. Never release a stretched band. Control the negative; a sudden release can whip a handle into your face at serious speed.
4. Training only the “easy” middle. Because resistance bands with handles load the end range hardest, short partial reps miss the point. Full stretch to full contraction, every rep.
5. Never progressing. The same single tube for six months is maintenance, not training. Add a tube, slow the tempo, or add reps — resistance bands with handles only build muscle when the challenge grows. More training explainers live in our fitness section.
6. Skipping inspection. Before each session, run each tube through your hands and look for nicks, discoloration, or thinning. Retire any tube that shows wear — a snapped band mid-press is avoidable.
Resistance Bands with Handles vs Other Equipment
| Factor | Resistance Bands with Handles | Dumbbells | Flat Loop Bands | Cable Machine |
|---|---|---|---|---|
| Cost (full set) | $25–$60 | $200–$600+ | $10–$25 | $1,500+ |
| Portability | Excellent (~1 kg) | Poor | Excellent | None |
| Max practical load | ~150 lbs stacked | Unlimited | ~50 lbs | 200+ lbs |
| Exercise variety | High (press, row, curl, squat) | Very high | Low (glutes, warm-ups) | Very high |
| Joint friendliness | High | Medium | High | High |
| Progressive overload | Good (stack tubes) | Excellent | Limited | Excellent |
| Space needed | 2 m² | 4–6 m² | 2 m² | 4 m² |
For beginners and intermediates, resistance bands with handles cover roughly 90% of what dumbbells do at a tenth of the cost and none of the space. Advanced lifters chasing maximal strength will eventually need barbells — but bands remain valuable for accessory work, deloads, and travel. Compared with flat loop bands, resistance bands with handles are the clear choice for a primary training tool: loops are warm-up and activation accessories, not a full program. If you want the cable-machine feel at home, bands with a door anchor are the closest sub-$60 approximation that exists.
Safety Essentials
Resistance bands with handles are safe when respected. Inspect tubes before every workout and retire any with nicks or thinning. Always anchor to the hinge side of a locked door — never a door that can swing open toward you. Keep the band’s path clear of your face during setup; if a tube ever slips off an anchor, it recoils toward the anchor point, so position yourself accordingly. Wear the handles properly (full grip, not fingertips) and never stretch a tube beyond about 2.5× its resting length — overstretching is the leading cause of snaps.
Start light for the first 2–3 sessions to learn each movement’s feel, especially overhead presses and rows where a slipped handle has the longest travel path. If you have a latex allergy, buy latex-free TPE resistance bands with handles — they perform nearly identically. And as with any new training program, check with a healthcare professional if you have cardiovascular issues, joint replacements, or are returning from injury. For general principles of safe progression, Wikipedia’s strength training overview is a solid primer.
Frequently Asked Questions
Can resistance bands with handles really build muscle?
Yes. Multiple studies, including a 2019 meta-analysis in SAGE Open Medicine, found elastic resistance produces strength and muscle gains comparable to free weights when sets are taken near fatigue. Resistance bands with handles work — effort and progression matter more than the tool.
How much resistance do bands with handles provide?
Individual tubes typically range from 10 to 50 lbs of peak tension. Because resistance bands with handles use stackable clips, combining tubes can deliver up to about 150 lbs of peak resistance — enough for serious home training.
Are resistance bands with handles better than loop bands?
For full-body strength training, yes. Resistance bands with handles allow pressing, rowing, and curling with natural grips and longer ranges of motion. Loop bands are better suited to glute activation and warm-ups than as a primary training tool.
How often should I replace resistance bands with handles?
Inspect tubes before every session and expect 6–12 months of regular use from quality layered-latex tubes. Retire any tube showing nicks, discoloration, or thinning, and store resistance bands with handles away from sunlight and heat.
Can beginners use resistance bands with handles?
Absolutely — they are one of the most beginner-friendly tools available. Start with the lightest tube, learn each movement with full range of motion, and add tubes as you get stronger. No spotter or rack is needed.
Do I need a door anchor for resistance bands with handles?
For pressing, rowing, and rotational movements, yes — the anchor is what makes resistance bands with handles replicate cable-machine exercises. Most sets include one. Standing on the tube works for curls, presses, squats, and deadlifts without an anchor.
Conclusion
Resistance bands with handles turn any room into a gym: stackable tension up to ~150 lbs, joint-friendly variable resistance, and a full-body program in 30 minutes, three times a week. Pick a quality layered-latex set, anchor it safely, progress your tubes, and the results will follow. Explore FitnMeet’s muscle-development range and start building your home setup today.
Note: This article is for informational purposes. Consult a healthcare professional before starting a new exercise program, especially if you have joint, heart, or blood-pressure conditions.