
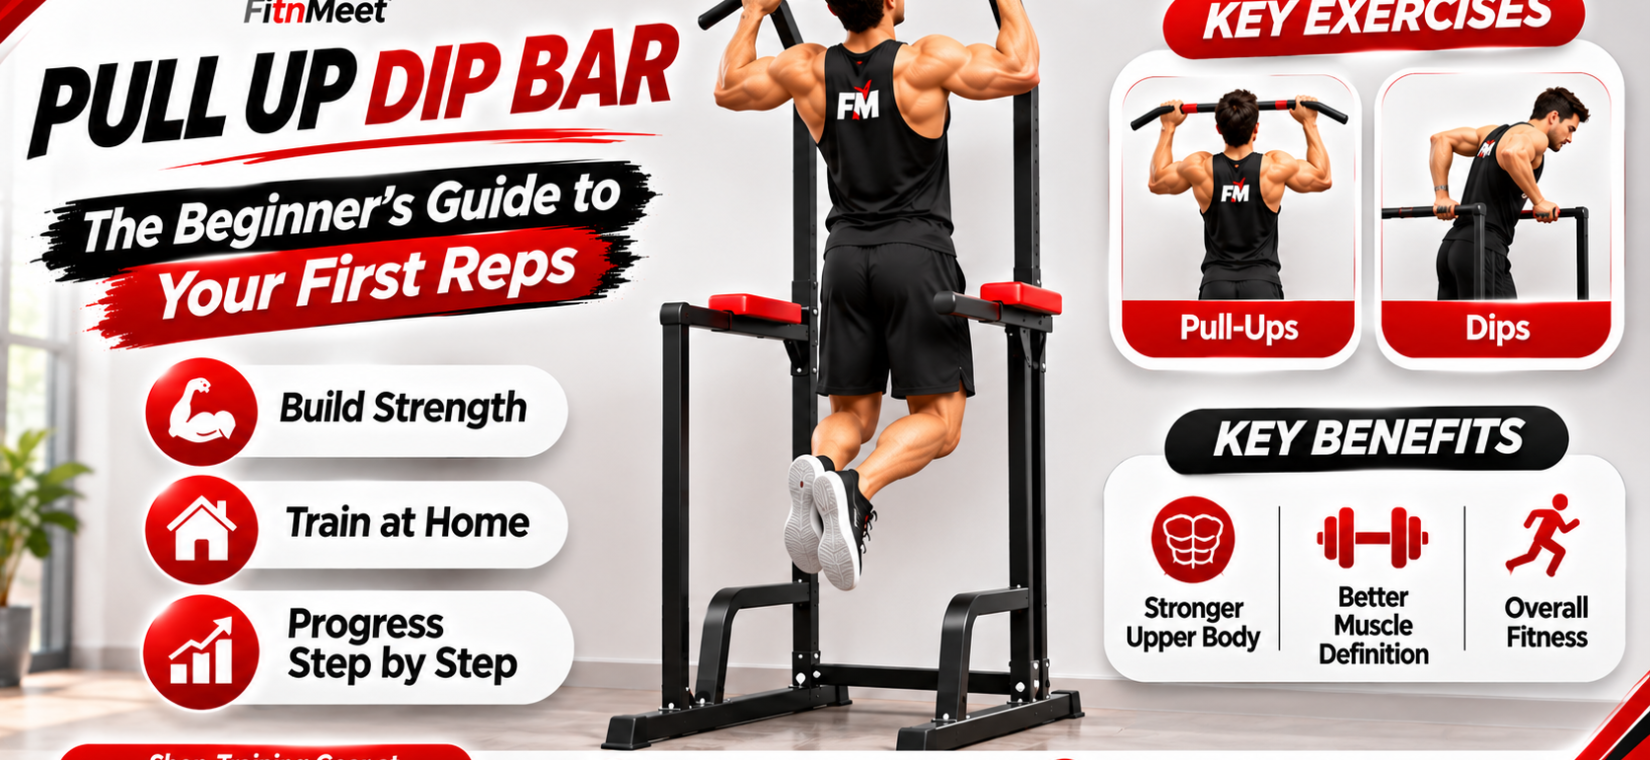
Pull up dip bar is a freestanding or wall-mounted station combining a pull-up bar with parallel dip handles. It covers the two foundational upper-body movements, pulling and dipping, in one footprint. Freestanding towers suit home gyms without doorframes for mounting, while wall-mounted versions save floor space and feel more stable.
Pull Up Dip Bar Explained Simply
👋 Start here: Think of a pull up dip bar as a jungle gym for adults. The top bar is for hanging and pulling yourself up (back and biceps). The lower parallel handles are for pushing yourself up between them (chest, shoulders, triceps). One piece of equipment, two classic exercises, zero experience required to begin.
If you cannot do a single pull-up yet, that is completely normal — most beginners cannot. Studies of untrained adults find that the average beginner manages zero to two pull-ups on day one. A pull up dip bar is valuable precisely because it supports the stepping-stone exercises (dead hangs, assisted reps, negatives) that take you from zero to your first real rep. Think of it like learning to swim: you do not start in the deep end.
The two moves, in plain language
The pull-up: hang from the top bar of your pull up dip bar with palms facing away, then pull your chin over the bar. This is the single best bodyweight exercise for your back — it builds the lat muscles that give your torso its V-shape. Learn more about the movement on Wikipedia’s pull-up page.
The dip: grip the parallel handles of your pull up dip bar, lift yourself up, then lower your body by bending the elbows and press back up. Dips are often called the “upper-body squat” because they load the chest, shoulders, and triceps so heavily. Details on Wikipedia’s dip exercise page.
What Is a Pull Up Dip Bar?
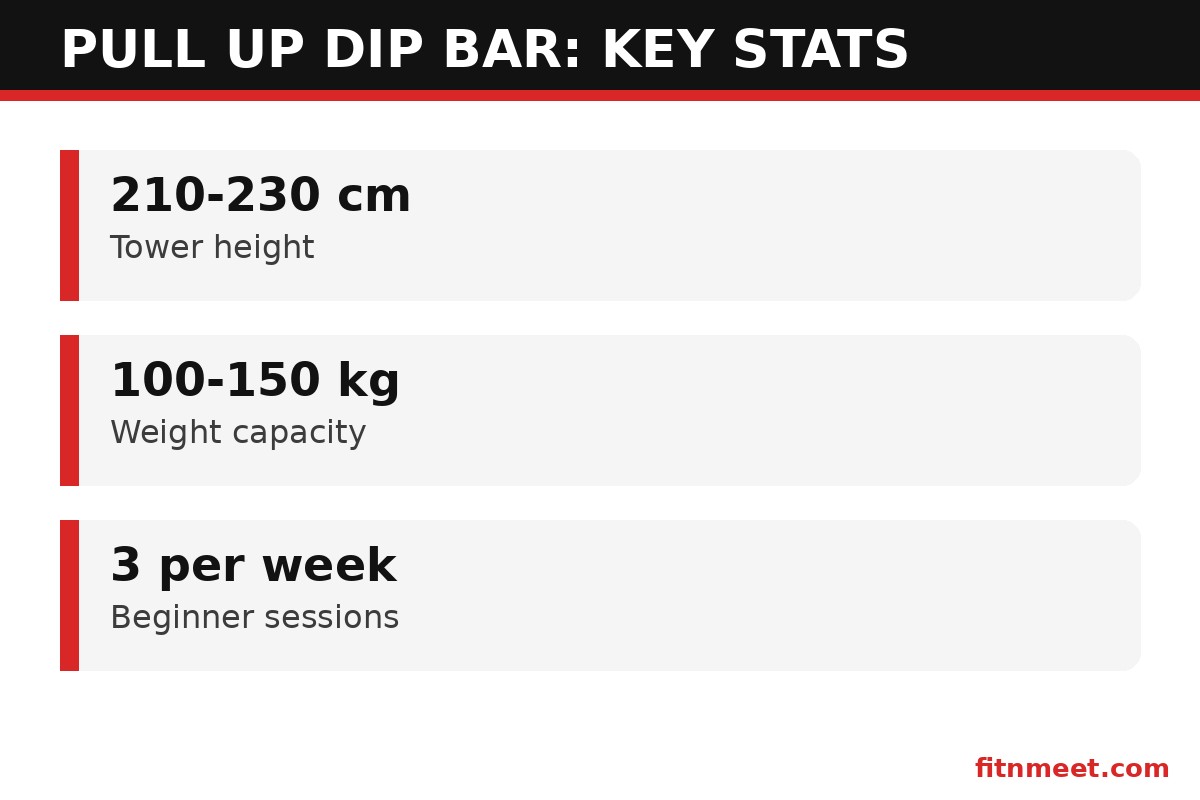
A pull up dip bar setup comes in two main forms. The freestanding power tower is a tall steel frame — typically 210–230 cm high — with a pull-up bar across the top, dip handles at mid-height, and often extras like push-up handles at the base and a vertical knee-raise station. It stands on its own, needs about 1 × 1.2 meters of floor space, and usually supports 100–150 kg of user weight.
The alternative is a doorway pull up dip bar: a bar that wedges into a door frame (no screws) for pull-ups and chin-ups, sometimes paired with separate dip bars that sit on the floor. Doorway models are cheaper and portable but typically support 100–130 kg and depend entirely on your door frame being solid — more on safety later.
For a beginner training at home, a freestanding pull up dip bar tower is the better long-term buy: it handles both exercises, does not depend on your landlord’s door frames, and grows with you from assisted reps to weighted dips. It is the home-gym equivalent of buying the textbook instead of renting chapters.
Why Beginners Should Care
Two exercises cover your entire upper body
Beginner programs drown in exercise lists. A pull up dip bar cuts through the noise: pull-ups cover every pulling muscle (lats, biceps, rear delts, traps) and dips cover every pushing muscle (chest, front delts, triceps). Add push-ups and squats and you have a complete full-body routine with one piece of equipment. One stat to remember: the pull-up and dip together activate more total upper-body muscle than any pair of machine exercises.
It measures progress honestly
Machines let you fool yourself with momentum and partial reps. A pull up dip bar does not: either your chin clears the bar or it does not. That honesty is motivating — going from zero to three pull-ups in 8–12 weeks is a transformation you can feel every single rep.
It is the cheapest complete upper-body gym
A decent pull up dip bar tower costs less than 3–4 months of a typical gym membership and lasts for years. For beginners testing whether they enjoy training, that math is unbeatable — and if you outgrow it, weighted vests extend its life indefinitely.
Bodyweight scales with you automatically
Here is the elegant part: as you lose fat or gain muscle on a pull up dip bar program, the exercises auto-adjust. Every kilogram lost makes pull-ups easier; every kilogram of muscle gained makes you stronger for them. Few training tools self-calibrate like bodyweight.
Getting Started: Your 5-Step Beginner Plan
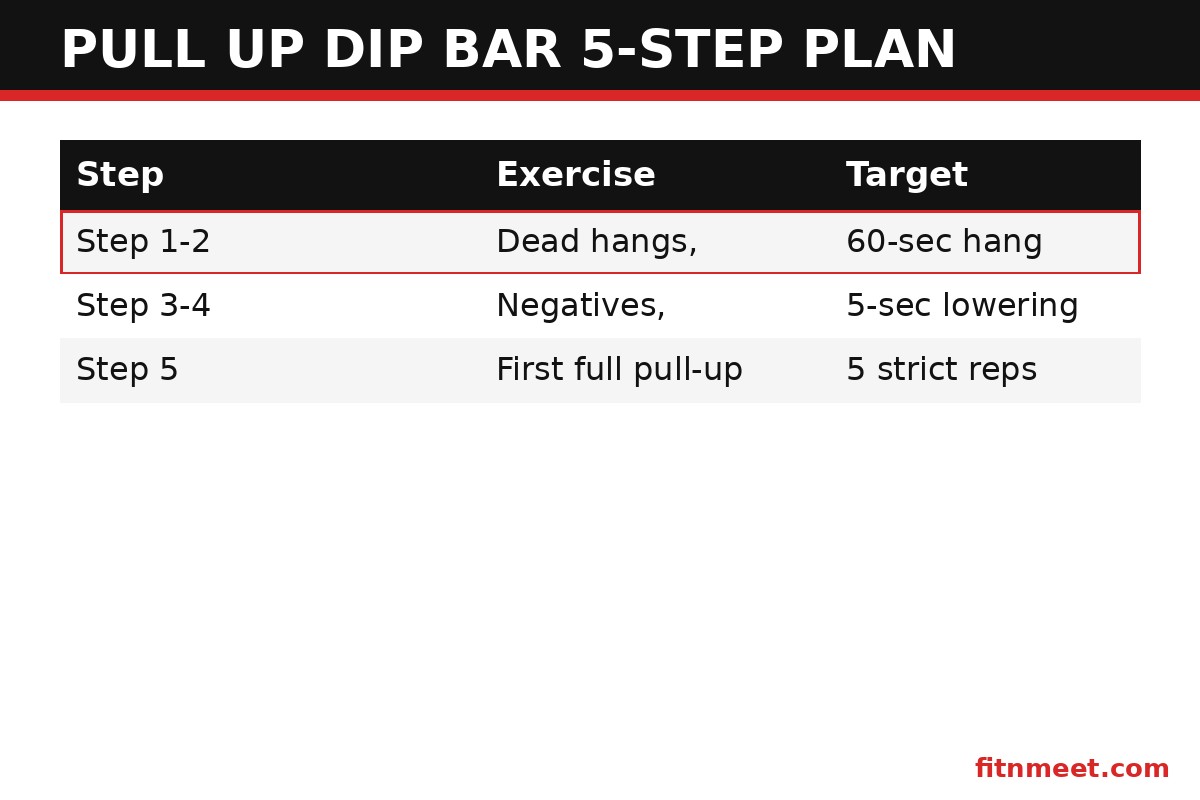
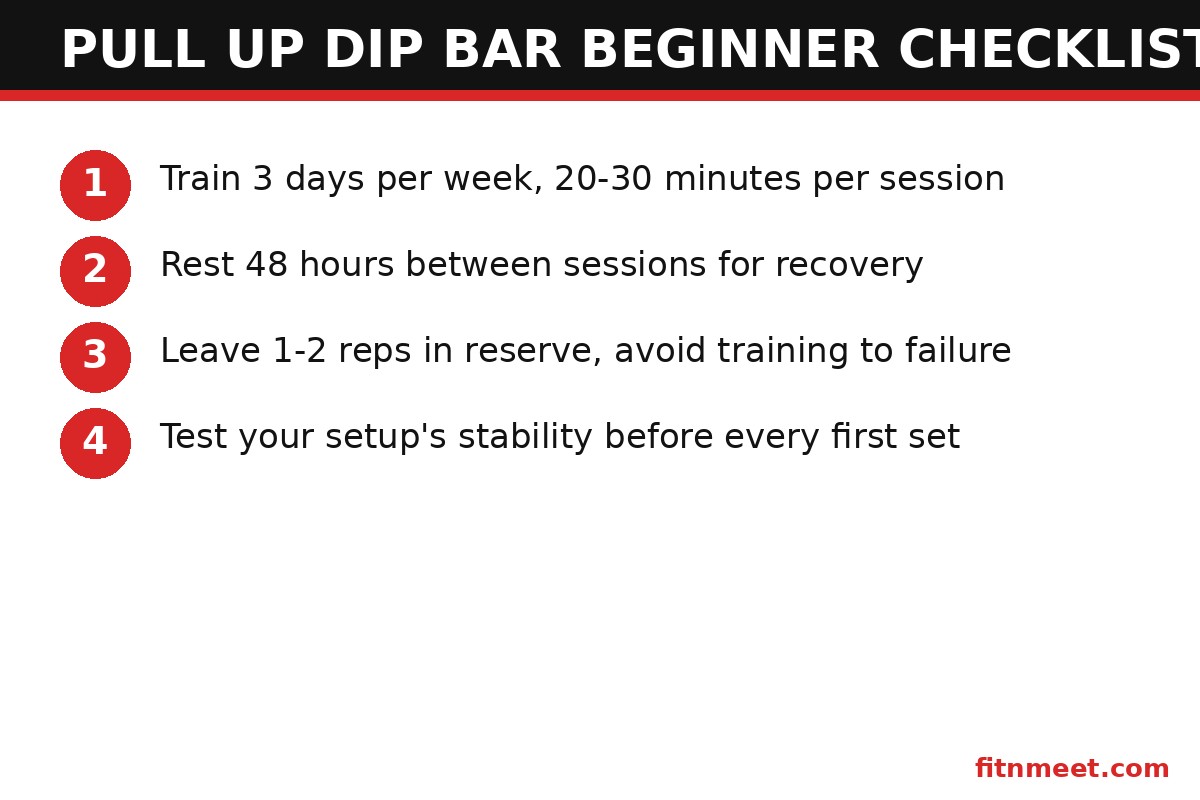
Follow this plan on your pull up dip bar three days per week (e.g., Monday, Wednesday, Friday). Each session takes 20–30 minutes.
Step 1: Master the dead hang (weeks 1–2)
Simply hang from the top bar of your pull up dip bar with straight arms. Aim to build from 10 seconds to 60 seconds across sets. This builds grip strength and gets your shoulders comfortable with hanging — the foundation everything else rests on. Do 3 hangs per session.
Step 2: Add scapular pull-ups (weeks 2–3)
From a dead hang, pull your shoulder blades down and together without bending your elbows, lifting your body 3–5 cm. This tiny movement teaches your lats to initiate the pull — the missing skill in most failed pull-ups. Do 3 sets of 8 on the bar.
Step 3: Do negatives (weeks 3–6)
Jump or step up so your chin is over the bar, then lower yourself as slowly as possible — aim for 5 full seconds. Negatives build the exact strength you need; research shows eccentric training transfers strongly to the full movement. Do 4 sets of 3–5 negatives per session.
Step 4: Try band-assisted reps (weeks 4–8)
Loop a resistance band over the top bar of your pull up dip bar and place a knee or foot in it. The band unloads 15–40 kg depending on thickness. Do 3 sets of 5–8 assisted pull-ups, using thinner bands as you get stronger.
Step 5: Your first full pull-up (weeks 6–12)
Test one unassisted rep every 2 weeks. When you get it, celebrate — then build volume with 5 sets of 1–3 reps, adding one rep per week. Most consistent beginners reach 5 strict pull-ups within 3–4 months of starting this plan.
👋 Start here — dips too: If full dips are too hard, begin with bench dips (hands on a chair behind you) for 3 sets of 10, then move to the dip handles of your pull up dip bar with a resistance band under your knees for assistance. Never do dips through shoulder pain — that is your body asking for a different starting point.
Benefits of Training on a Pull Up Dip Bar
Real-world strength
Pulling your own body over a bar and pushing it up between handles is strength you can actually use — climbing, lifting, carrying. A pull up dip bar builds the kind of capability that shows up outside the gym, not just numbers on a machine’s weight stack.
Posture improvement
Desk workers live in a hunched position. Pull-ups on a pull up dip bar directly strengthen the mid-back muscles that pull your shoulders back — many beginners notice their posture improving within 4–6 weeks, simply because the weak link finally gets trained.
Joint-friendly loading
Bodyweight exercises on a pull up dip bar load joints through natural movement paths. Compared with heavy barbell pressing, dips and pull-ups are gentler on beginners’ joints while still providing plenty of stimulus for growth — your bodyweight is already a serious load when you are starting out.
No commute, no excuses
The number-one beginner program killer is friction. A pull up dip bar in your bedroom or garage removes travel, waiting for equipment, and gym anxiety. Consistency beats perfection — and the equipment you will actually use wins every time.
Visible progress, fast
Few things change a physique like pull-ups and dips: wider lats, thicker chest, defined arms. Because a pull up dip bar trains so much muscle at once, beginners often see visible upper-body changes within 8 weeks of consistent training — paired with enough protein from the protein collection to support growth.
Common Beginner Mistakes
- Skipping the dead hang phase. Jumping straight to pull-up attempts with zero hanging base strains the shoulders and elbows. Spend 2 weeks on hangs first — your pull up dip bar is also a grip trainer.
- Half-rep dips. Dipping 5 cm and calling it a rep builds nothing and irritates shoulders. Lower until your shoulders are just below your elbows, or use band assistance to reach full depth safely.
- Training to failure every session. Grinding out max-effort sets daily fries your nervous system and stalls progress. Leave 1–2 reps in reserve on most sets.
- Ignoring the legs. A pull up dip bar is upper-body equipment — add bodyweight squats and lunges so you do not build an impressive torso on untrained legs.
- Comparing day one to year three. Social media shows the highlight reel. Your only competition is last week’s version of you and your pull up dip bar.
- No progression plan. “Do some pull-ups sometimes” is not a program. Follow the 5-step plan above, log your reps, and progress weekly. The FitnMeet fitness articles have more beginner programming.
How Often to Train: The Basics
Think of training frequency like watering a plant — regular and moderate beats occasional flooding. For your pull up dip bar routine:
| Level | Sessions per week | Sets per session | Notes |
|---|---|---|---|
| Absolute beginner (0 pull-ups) | 3 | 3–4 (hangs + negatives) | Technique and tendon conditioning matter most |
| Beginner (1–5 pull-ups) | 3 | 4–5 | Alternate pull-up and dip emphasis days |
| Intermediate (6–12 pull-ups) | 3–4 | 5–6 | Add weight or harder variations |
Rest 48 hours between sessions working the same muscles — your pull up dip bar will still be there tomorrow, and muscles grow during recovery, not during the workout. Sleep 7–9 hours and eat roughly 1.6 g of protein per kg of bodyweight daily; training provides the stimulus, but food and rest build the muscle. The science of bodyweight training confirms what coaches have always known: progressive overload works with any implement, including your own body.
Safety First
⚠️ Start here — safety: A pull up dip bar is only as safe as its setup. Freestanding towers must sit on flat, level ground — wobble means stop and reposition. Doorway bars must be tested with your full bodyweight before your first real set: hang for 10 seconds with your feet ready to catch you. Check weight ratings (typically 100–150 kg) and never exceed them.
- Warm up 5 minutes before touching your pull up dip bar: arm circles, band pull-aparts, and easy hangs prepare shoulders and elbows.
- Stop for sharp pain. Muscle burn is normal; sharp shoulder or elbow pain is a signal to stop the exercise and reassess — dips especially deserve respect here.
- Keep the area clear. You need space to swing slightly and to step off safely. Do not place your pull up dip bar where a slip means hitting furniture.
- Maintain the equipment. Check bolts monthly on freestanding towers; re-test doorway bars weekly. A 2-minute check prevents accidents.
- Progress gradually. Tendons adapt slower than muscles — roughly half the speed. The 5-step plan’s timelines exist to protect your connective tissue, not to slow you down.
This article is for informational purposes only and is not medical advice. Consult a healthcare professional before starting any supplement or exercise program.
Frequently Asked Questions
What is a pull up dip bar?
A pull up dip bar is home gym equipment combining a pull-up bar with parallel dip handles, usually as a freestanding power tower. It lets you train pull-ups for the back and biceps plus dips for the chest, shoulders and triceps with one piece of equipment.
Can a beginner use a pull up dip bar with zero pull-ups?
Absolutely. Start with dead hangs (build to 60 seconds), then scapular pull-ups, then slow negatives, then band-assisted reps. Most consistent beginners get their first full pull-up within 6-12 weeks of consistent training.
How much space does a pull up dip bar need?
A freestanding pull up dip bar tower needs about 1 x 1.2 meters of floor space and 210-230 cm of ceiling height. A doorway bar needs only a solid door frame but offers fewer exercise options.
How often should a beginner train on a pull up dip bar?
Three sessions per week with 48 hours rest between them is ideal for beginners. Each session takes 20-30 minutes. Muscles grow during recovery, so rest days are part of the program, not skipped days.
Are dips on a pull up dip bar safe for shoulders?
Dips are safe when done with full control and no sharp pain. Lower until shoulders are just below elbows, keep the movement smooth, and start with band assistance or bench dips if full dips hurt. Stop immediately for sharp shoulder pain.
What muscles does a pull up dip bar work?
Pull-ups target the lats, biceps, rear delts and traps; dips target the chest, front delts and triceps. Together on a pull up dip bar they cover nearly the entire upper body with two movements.
Conclusion: Your First Rep Is Closer Than You Think
Every person doing effortless sets of pull-ups once hung from a bar for ten shaky seconds. The bar gives you the tool; the 5-step plan gives you the path; all that is missing is the first session. Start with dead hangs today — not Monday, not next month, today — and in 8–12 weeks you will be answering someone else’s “how did you learn pull-ups?” question.
You have got this. When you are ready to support your training with proper nutrition, visit the FitnMeet shop, explore the muscle development collection, and keep learning on the FitnMeet blog.